Hi readers. I have started a new blog: thirdfloorquilts.com
I will be redirecting this blog to my new site. I hope you will stay with me and will follow me on my new and improved blog. Apologies for the hassle of having to change sites... I first starting blogging in 2011, then I started Quilting.Sewing.Living. a month ago. And a month in blog years is like... well years... in dog years.
So I decided to start over with a new name - one you can remember hopefully - a new and improved design and a commitment to focus the content on quilts that hang on your wall.
In the meantime, you'll find me on the third floor. Quilting... and blogging!
Please click over to my new site:
thirdfloorquilts.com

a blog about art quilts and all things handmade from texas
Tuesday, September 10, 2013
Tuesday, September 3, 2013
Tool Review - Perfect Circles
I've bought a lot of stuff over the years. Some of it just sits there, collecting dust... some of it I can't even remember the point. Thankfully, every now and then, something comes along that you end up using again, and again and again.
For me, the perfect tool is Karen Kay Buckley's Perfect Circles for applique. These little jewels are thin, durable, heat-resistant plastic that allow you to gather fabric around the edge, starch it and then push the iron over the edge for a perfect circle. Yep, it's that easy.
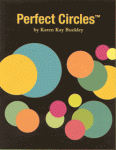
There are 16 sizes in the package, 4 of each size. Karen also has a set for larger circles.
If you are doing edge-turn applique, these are a must have! You'll wonder how you ever made circles before. Here's a link to Karen's site. She teaches also and her class is excellent.
http://www.karenkaybuckley.com/store.php?cat=2
For me, the perfect tool is Karen Kay Buckley's Perfect Circles for applique. These little jewels are thin, durable, heat-resistant plastic that allow you to gather fabric around the edge, starch it and then push the iron over the edge for a perfect circle. Yep, it's that easy.
There are 16 sizes in the package, 4 of each size. Karen also has a set for larger circles.
If you are doing edge-turn applique, these are a must have! You'll wonder how you ever made circles before. Here's a link to Karen's site. She teaches also and her class is excellent.
http://www.karenkaybuckley.com/store.php?cat=2
Sunday, September 1, 2013
A Quilt of Urban Images
Forget the red barns and the green pastures.
I live in the inner city... in a town with no zoning. We're wildcatters here in Texas, and we don't take kindly to too many rules.
 So for us Houstonians, that means life in the city is both eclectic and gritty, clean and messy, with less traffic and more potholes.
But best of all, no zoning means we have plenty of open space for art... but only if you keep your eye open.
For years I've wanted to quilt these images. So here goes... I'm starting a collection of drive-by art.

The beer can house... a classic Houston icon!

And the big red chicken to lead the way home...

My collection will eventually become a "Quilt of Urban Images." I'm envisioning it to be about 6 or 7 feet long, maybe15 inches high... with panels featuring the funkiest, most colorful and most eclectic images.
Should only take about a year or so. Any thoughts? Ideas? Contributions?
All of the "drive by's" were photographed by me in and around my neighborhood. More to come...
I live in the inner city... in a town with no zoning. We're wildcatters here in Texas, and we don't take kindly to too many rules.
 So for us Houstonians, that means life in the city is both eclectic and gritty, clean and messy, with less traffic and more potholes.
 But best of all, no zoning means we have plenty of open space for art... but only if you keep your eye open.
For years I've wanted to quilt these images. So here goes... I'm starting a collection of drive-by art.
We'll start with two tall Texans...

The beer can house... a classic Houston icon!

And the big red chicken to lead the way home...

My collection will eventually become a "Quilt of Urban Images." I'm envisioning it to be about 6 or 7 feet long, maybe15 inches high... with panels featuring the funkiest, most colorful and most eclectic images.
Should only take about a year or so. Any thoughts? Ideas? Contributions?
All of the "drive by's" were photographed by me in and around my neighborhood. More to come...
Wednesday, August 28, 2013
A Whole Cloth Odyssey, Part 1
Quilting offers so much artistic expression... and an infinite numbers of ways to go about expressing your ideas. I've willingly chosen hand-applique, hand embroidery and hand-quilting for 16 years and I love it.
Six months ago, I bought a new Bernina and it has changed my perspective in ways I never thought possible... especially after several classes and a few hundred (yes, hundred!) hours of practice. Now that I actually know how to operate such a powerful machine, I'm having so much fun sewing on it, quilting on it and exploring all its many wonders.
But even with all this technology, for me, some quilts still require that 'old school' touch, and the one I'm working on now is a case in point.
I'm calling this one a whole cloth odyssey because I found this amazing fabric and I've decided to keep it whole. I've had the fabric for a couple years, and I've drug it out from time to time and considered cutting it up, but each time I realized that the parts were not as strong as the whole.
It is also an odyssey for me because I'm stretching my hand-work in new ways by bringing as much depth as possible to my embroidery, plus the final outcome is unknown. I expect it'll be a hand/machine mash up.
Pictured below is the cast-on stitch I just learned. (Thanks to Mary Corbert and her Needle 'N Thread blog for the countless free how-to videos and excellent eBook!) I also plan to incorporate the fabulous Amy Butler ribbon in the picture below --- using a lot of ribbon will be a first for me.
These 3 photos are part one. Check back again next week and I'll post more pics as I go - until eventually - the whole cloth will be revealed.

This flower bed is only half done. The orange stitches are made with a single strand of DMC floss - yes, just one strand at a time. Keeping it light and it looks like a painter just brushed on a touch of color.


The Freshly Pieced blog has a Wednesday WIP link up, and well this one is certainly a work in progress. So I plan to share the odyssey as it evolves each Wednesday. Stay tuned. I'm guessing four to six weeks? (might be a bit optimistic...)
Thanks Lee for the link-up!
http://www.freshlypieced.com/
Saturday, August 24, 2013
Photographing Fabric for Fun!
It's been a long time since I dusted off the camera and took pictures for the sole purpose of creating images just for fun.
During my former (corporate) life, I was always too busy and most of the photography demands in our family get passed off to the husband (he happens to be a professional, so hey, if the shoe fits...) When I did snap a pic in the past, every photo had a purpose: Capture a moment. Remember the scenery. Document life.
I recently found a quilt photo workshop / link-up on the Plum and June blog, and I got jazzed up! I decided to see if I still have any creative photo skills left in me. As side benefit to this challenge... I got to play with all the amazing 'fabric-in-waiting' I've collected over the years. (Some of this fabric had actual dust on it, but that's another story...)
I took dozens of images. These are the best of the collection.
To start the fun, I brought out some very special textiles I collected from a lovely shop in Tanzania... and I styled these fabrics alongside my grandmother's Singer.

Next I dusted off a reproduction fat quarter pack that I've had front and center on a shelf for years. These are so cool, I haven't even untied them yet. These also seemed to be a natural blend with my grandmother's sock monkey.
 The last one is the back of a huge quilt I made from a Kim McLean pattern called Hearts and Flowers. It's kinda funny that I spend hours selecting fabric for the back and preparing it, then I never seem to display it, or even pay it much attention after the quilt is finished. This quilt was made using all hand-applique and is hand quilted and I especially love this image because it shows off all my tiny hand-quilted stitches (hopefully the "web" version of this photo still shows the detail). And if not, well then, you have to admit this fabric is just awesome.


During my former (corporate) life, I was always too busy and most of the photography demands in our family get passed off to the husband (he happens to be a professional, so hey, if the shoe fits...) When I did snap a pic in the past, every photo had a purpose: Capture a moment. Remember the scenery. Document life.
I recently found a quilt photo workshop / link-up on the Plum and June blog, and I got jazzed up! I decided to see if I still have any creative photo skills left in me. As side benefit to this challenge... I got to play with all the amazing 'fabric-in-waiting' I've collected over the years. (Some of this fabric had actual dust on it, but that's another story...)
I took dozens of images. These are the best of the collection.
To start the fun, I brought out some very special textiles I collected from a lovely shop in Tanzania... and I styled these fabrics alongside my grandmother's Singer.

Next I dusted off a reproduction fat quarter pack that I've had front and center on a shelf for years. These are so cool, I haven't even untied them yet. These also seemed to be a natural blend with my grandmother's sock monkey.


These 3 pictures were taken with available light from the windows in my tiny sewing studio, plus the ubiquitous Ott light substituting as my back light (aka hair light). The fabric is sitting on my cutting table with a make-shift white back drop to give it that clean look. So fun. I might just do this again!
Here is a link to the quilt photo workshop:
Wednesday, August 21, 2013
Variations on a flag quilt - in 3D, sort of
I've always been inspired by flag art, but never wanted to make the same old, same old. I started playing around with my stash of washed-out blue fabrics and ended up cutting out hundreds of squares from a few of my favorites. Each square is intentionally a random, imperfect size.
Then when I had piles and piles of blue squares, I decided to add in a few red ones (also from a muted color palette) to brighten things up. Otherwise, this would truly have been a "blue period" quilt for me - and I just didn't want to go there!
Eventually, all these squares led me back to the variation on a flag theme.
I tested out a lot of ideas to get a three-dimensional look and various ways to get the threads and everything loose... going for a semi-deconstructed look. I hand-dyed the batting and cut up small squares of batting to sit under each fabric square. It was supposed to be navy blue, but turned more purple, but that's another story. Batting takes in color with a mind of its own.
I hand embroidered the raised squares to the quilt top with pearl cotton and left the connecting threads loose on the top.
There are 735 squares, yep I counted them!
The white dove is hand pieced together, covered in tulle and lace and machine quilted (my hand is in the photo to give it some scale). He's hanging on ribbon, adding yet another dimension to the whole look.
I'm pretty happy with the final product.


Monday, August 19, 2013
Quilting at daybreak
<a href="http://www.bloglovin.com/blog/10364279/?claim=na9xaxsnry3">Follow my blog with Bloglovin</a>


Subscribe to:
Posts (Atom)